|

|
Universally recognized as "The
Bible of The Cutting Edge", this book belongs in the library of
anyone who is serious about sharpening. Written by Guinness world record
holder John Juranitch, it contains all the knowledge and insights gained
during his more than 40 years in the sharpening industry. The 145 page
book is crammed with photos, illustrations and cutting edge secrets you
won't find anywhere else. Its 14 chapters cover topics like how to
choose a knife, sharpening theories and applications, steeling, using a
hone and much, much more. You'll get answers to the most asked
questions. You'll learn the truth about common myths like why you should
never use oil on a hone. And you'll get the insights necessary to put a
great edge on knives, axes, fish hooks, arrowheads, chain saws and other
tools. It's a history, a handbook, a reference manual that is the
simplest, most complete way to give yourself a razor edge on sharpening. |
There are few tools more dangerous than a dull
knife! It'll slide when you want it to cut, and it'll cut when it stops
sliding--usually when it hits your hand. Ask ten different people how
they sharpen their knives, however, and you may get ten different
answers. Not only that, but each of these ten methods are all sworn to
be the best by ten venerable trail guides from ten mountain towns
(who've all been sharpening knives since they were knee-high to a
carpenter ant and don't you forget it buddy). What's a poor soul with a
dull knife to do? You can start with this tutorial, which will lead you
out of the tangled thicket of knife-sharpening opinions.
Why You DO NOT Wash Your Boning
(Butcher) Knife in the Dishwasher
Choose your
stone
First, there's the question of whether or not to use a liquid on
the sharpening stone. A fiery debate rages on this issue, and you'd
better figure out which side you're on, so you're not mistaken for the
enemy and accidentally shot. Some stones are marketed as specifically
for wet and dry uses, so keep the following points in mind as you shop
around.
- One school of thought insists that using oil, water or saliva
helps "float" the tiny metal shavings away from the stone
when the blade is being sharpened.
- The other camp demands that using any type of liquid just clogs
up the pores of the stone (which ruins the stone forever) and only
polishes the blade, rather than grinding it.
The method below works with both dry and wet
stones.
Recreate the basic
edge
If you were to peer at the point of a nicely sharpened, multi-purpose
knife blade, it would look something like Figure 1.
You'll notice that the blade is actually beveled to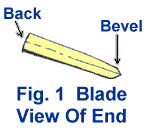 form the final edge, but you won't create that bevel just yet. First,
you'll form the basic edge, which is a little simpler in shape, as we
see in Figure 1A.
form the final edge, but you won't create that bevel just yet. First,
you'll form the basic edge, which is a little simpler in shape, as we
see in Figure 1A.
One of the key points of
knife-sharpening is maintaining constant angles between the blade and
the stone. 
There are two: the angle between the blade and the edge of the stone,
and between the blade and the
surface of the stone.
|
Place your flat, medium-grit stone on the
table in front of you. Lay the blade flat on
the stone at a 45 degree angle, as shown
in Figure 2. This 45 degree
angle is the
first of two angles. |
 |
Grasp the knife by the handle. With your index finger
along the back of the blade, raise the blade off the surface of the
stone at a 20 degree angle, as shown in Figure 3.
This is the second angle.
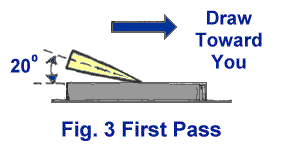
Keeping the edge of the blade in contact with the stone, firmly and
carefully draw the knife towards you. This action will grind the blade
from hilt to point. Maintain the 45 degree angle, and the angle that
you've raised the blade off the stone.
Apply medium to light pressure as you're drawing the edge across the
stone. (For the sake of comparison, zero pressure would have the knife
blade resting on the stone without you touching it.) Apply a little
pressure or a bit more, depending on how old the knife is, how many
times you've sharpened it, and the current condition of the edge. A very
dull edge will require more pressure.
Turn the knife over, and repeat the process. If you
keep the knife in the same hand, you'll be pushing the blade away from
you this time. It's important to maintain the same angles on both sides
of the blade. Go slowly and alternate strokes on the stone until each
side of the blade has been stroked several times. A very dull knife will
need a few more strokes than a better kept one.
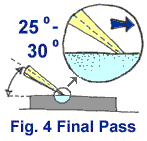
Create the final bevel
Now that you have a basic edge on the blade, it's a
time to create the final bevel. This will strengthen the edge, so that
it stays sharp longer and is less prone to be damaged by everyday use.
You'll create the bevel simply by repeating Step 1, with two
modifications: use a fine-grit stone, and raise the blade a bit higher
off the stone (the second angle) when you draw it across.
Place your flat, fine-grit stone on the table in front of you, and
lay the blade flat on the stone at a 45 degree angle, as you did
before.
Grasp the knife by the handle. With your index finger along the back
of the blade, raise the blade off the surface of the stone at a slightly
greater angle than before--maybe 25 to 30 degrees. See
Figure 4.
Keeping the edge of the
blade in contact with the stone, firmly and carefully
draw the knife towards you. This action will grind the blade
from hilt to point. Hold the 45 degree angle, and the angle that
you've raised the blade off the stone, as constant as possible.
Again, apply medium to light pressure as you're drawing the edge
across the stone.
|
 |
Turn the knife over, and
repeat the process. Alternate strokes again until each side
of the blade has been across the stone several times--about five strokes
for each side should suffice. The pressure that you apply while drawing
the blade across the stone should get progressively lighter with each
stroke.
At this point you should have a pretty sharp knife. You
can test it by holding a piece of paper vertically, and
drawing the blade across the edge and down. A sharp knife will cut the
paper.
|

